

NetSuite, the leading cloud ERP platform, streamlines business processes, but connecting it to the external world is a challenge, which the NetSuite API seamlessly addresses. Whether you're running an eCommerce platform, a CRM, or inventory management software, keeping your data in sync across all systems is crucial. Real-time synchronization ensures your information is always up to date, reducing errors, improving decision-making, and enhancing customer experiences.
In this article, we will explore the power of the NetSuite API for real-time synchronization. We’ll explore its key features, and the setup process, share best practices, and tackle common challenges utilizing most of NetSuite’s integration capabilities.
What is NetSuite?
NetSuite is a cloud-based platform that helps businesses manage daily operations such as accounting, inventory, sales, and customer relationships in a centralized way. While it's an ERP solution it also includes CRM and e-commerce features as well. It is backed by Oracle and is cloud which takes away the headache of the business to host or maintain it themselves making it the ideal tool for business.
If we think from the developer's perspective NetSuite is highly customizable and developer friendly. It has many options such as SuiteScript which is a javascript-based framework. This helps in creating custom business logic automating workflow and building custom pages.
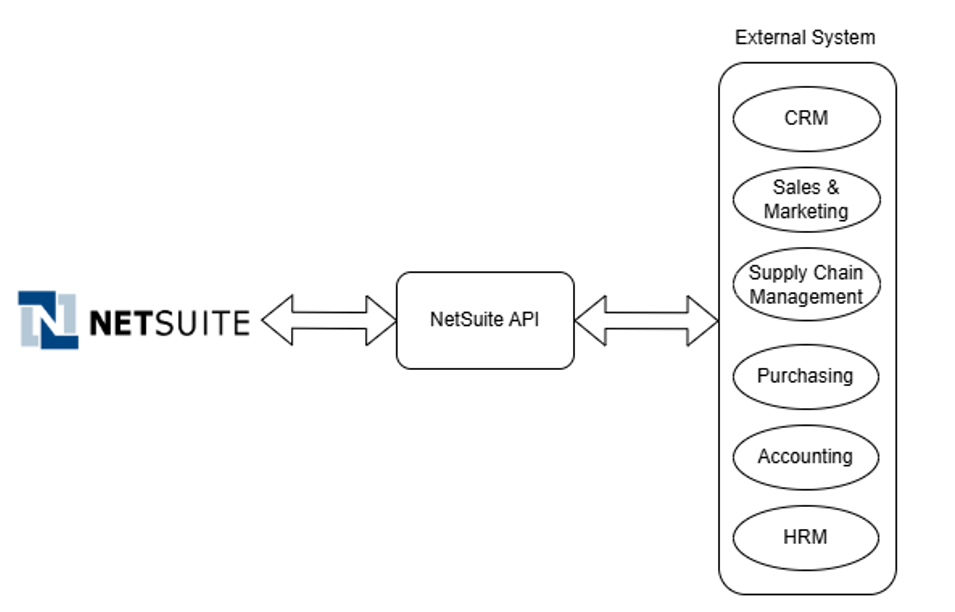
While NetSuite is a complete tool in itself, in the real world you will rarely work with it in isolation. Mostly we have to integrate it with other external systems. This can be done using NetSuite API which supports both REST and SOAP-based services. Let's see which of these two options would be ideal for our use case for building a real-time sync system.
Understanding NetSuite API
The NetSuite API lets other systems connect with NetSuite, making it easier to share data and automate tasks. It provides ways to pull, update, and add records in NetSuite. This connection helps businesses keep things in sync between NetSuite and other apps. In simple terms, the NetSuite API makes it easier to manage and share information across different systems.
When integrating NetSuite with other systems, you’ll have two main options: REST and SOAP. Both work well for different needs, but choosing the right one depends on what you’re aiming to do.
What is REST API?
The REST API is simple, fast, and easy to work with. It’s great for mobile and web apps and integrates smoothly with other platforms.
- - It uses JSON which makes it easy to work with and integrate data.
- - It is stateless meaning no need to track session data, which is perfect for cloud-based setups.
What is SOAP API?
The SOAP API is older and more structured. It uses XML and is better for handling complex transactions, especially in larger systems.
- - It uses XML which is ideal for complex integrations requiring strict rules and validation.
- - Makes it easier to handle advanced workflow which is great for big businesses or systems with lots of moving parts.
Which one is best for real-time sync?
While SOAP is great for more complex setups, REST shines when you need something lightweight and quick. For real-time sync, REST is usually the better choice. It’s faster, more flexible, and simpler to use, especially if you’re dealing with smaller datasets and need quick updates.
NetSuite provides many options for integration with external systems using NetSuite API. let's explore our options and choose the ideal one for our use case based on our needs.
NetSuite API options for real-time events
NetSuite API is one of the most powerful ways to integrate with NetSuite. However, the challenge is that NetSuite APIs are built for transactional data, not streaming updates. But with the right techniques, we can achieve near real-time synchronization.
Let's explore the options that we have for real-time sync with NetSuite API.
Option 1: Polling the API
This is the simplest method but introduces some delay. You periodically query the API for changes. While polling works, it can be inefficient and may hit API rate limits.
- Example: We can create a script that will run every 10 minutes to check for newly created or updated invoices and then sync them with the external system.
- Pros: Easy to implement and straightforward approach.
- Cons: Inefficient, as it repeatedly calls the API even when no data has changed.
Option 2: Push updates with SuiteScript
SuiteScript allows us to create customized scripts that run when some events occur in NetSuite. Events can be like a new sales order created.
- Example: We can create a script using SuiteScript and then call the external webhook for real-time sync.
- Pros: Faster than polling since updates are pushed as they happen.
- Cons: The response format is not customizable unless additional logic is implemented.
Option 3: Middleware for real-time sync
For complex systems, consider creating a middleware layer that sits between NetSuite and other applications. The middleware handles all the synchronization logic.
- Example: A middleware can receive the webhook events from within the NetSuite and then it can process the data like convert to currently or validate the data. This then can be sent to the external system.
- Pros: More scalable and flexible than direct API calls. Enables advanced features like logging, error handling, and business rule enforcement.
- Cons: Adds architectural complexity, which may be unnecessary for simple integrations.
Choosing the best way for the requirement
While each of these methods can work on its own, the most effective solution is often a combination of approaches. By leveraging NetSuite’s capabilities along with webhooks and middleware, you can achieve near real-time synchronization without overloading your system or hitting API limits. This hybrid approach ensures that data flows smoothly across all your platforms, making the integration more efficient and responsive.
With the approach finalized, let's now see how can a real-time system be built using this approach.
Building a real-time integration using NetSuite API
Imagine you need to sync newly created sales orders in NetSuite with an external application in real time. This external application could be your company website, a CRM system, or any other platform your business relies on. Whenever a sales order is created, your script will send the necessary order details to a webhook endpoint in the external system.
Let’s take a step-by-step approach to see how can a real-time integration can be built with NetSuite API.
Step 1: Write a SuiteScript
SuiteScript is NetSuite’s JavaScript-based framework for customization. We will write a user event script that triggers when a sales order is created.
How to set up a user event script:
1. Create a new script file:
- - Log in to NetSuite as an Administrator.
- - Go to Customization > Scripting > Scripts > New.
- - Upload your SuiteScript file.
2. Attach the script to the sales order record:
- - Navigate to Customization > Scripting > Script Deployments > New.
- - Select your script.
- - Choose the Sales Order record type.
- - Set the deployment type to After Submit (to trigger after a record is saved).
Here’s an example of what your SuiteScript might look like. Modify it based on your specific use case.
/**
 * @NApiVersion 2.x
 * @NScriptType UserEventScript
 */
define(['N/https', 'N/log'], function(https, log) {

    function afterSubmit(context) {
        if (context.type !== context.UserEventType.CREATE) {
            return; // Only trigger on new sales orders
        }

        try {
            // Get the sales order record
            var salesOrder = context.newRecord;

            // Extract relevant fields
            var orderData = {
                id: salesOrder.id,
                customerId: salesOrder.getValue({ fieldId: 'entity' }),
                totalAmount: salesOrder.getValue({ fieldId: 'total' }),
                items: []
            };

            // Iterate through line items
            var lineCount = salesOrder.getLineCount({ sublistId: 'item' });
            for (var i = 0; i < lineCount; i++) {
                orderData.items.push({
                    itemId: salesOrder.getSublistValue({ sublistId: 'item', fieldId: 'item', line: i }),
                    quantity: salesOrder.getSublistValue({ sublistId: 'item', fieldId: 'quantity', line: i }),
                    amount: salesOrder.getSublistValue({ sublistId: 'item', fieldId: 'amount', line: i })
                });
            }

            // Define the webhook URL
            var webhookUrl = 'https://your-webhook-endpoint.com/salesorder';

            // Send the data to the webhook
            var response = https.post({
                url: webhookUrl,
                body: JSON.stringify(orderData),
                headers: {
                    'Content-Type': 'application/json'
                }
            });

            // Log the response for debugging
            log.debug({
                title: 'Webhook Response',
                details: response.body
            });

        } catch (error) {
            log.error({
                title: 'Error Sending Webhook',
                details: error.message
            });
        }
    }

    return {
        afterSubmit: afterSubmit
    };
});
Let’s now understand what we are doing in the above SuiteScript block:
1. We are checking if the event type is 'CREATE'. The script only runs when a new sales order is created, so if it’s not a new record, the script exits early without performing any action.
2. Then, we prepare the data for sending. This extracted data is organized into a JSON object, which is used for transmitting data over the internet.
3. Now, we send the data to a webhook. The script makes a POST request, sending the JSON data to an external system, enabling it to receive and process the sales order information.
4. We are also logging the response from the webhook. Once the data is sent, the script captures the response from the external system and logs it for monitoring and debugging purposes.
5. Finally, we handle errors. If any issues arise during the process, the script catches the error and logs the details for troubleshooting.
Next, we have to configure the webhook endpoint.
Step 2: Configure your webhook endpoint
A webhook is essentially a URL endpoint that listens for incoming HTTP POST requests. When your SuiteScript sends data to the webhook, your external system processes it.
Build the webhook in your preferred backend framework (e.g., Node.js, Python Flask, Ruby on Rails).
Here’s a simple example using Express:
const express = require('express');
const app = express();

app.use(express.json()); // Parse JSON payloads

app.post('/salesorder', (req, res) => {
    const orderData = req.body;

    console.log('Received Order:', orderData);

    // Process the data (e.g., store in a database or trigger another action)
    // ...

    res.status(200).send('Order received successfully');
});

const PORT = 3000;
app.listen(PORT, () => {
    console.log(`Webhook listening on port ${PORT}`);
});
Use a cloud service like AWS, Azure, or Google Cloud to deploy your webhook. Alternatively, deploy it on services like Heroku or Vercel for quick setup.
Use tools like Postman or cURL to simulate POST requests to your webhook and verify that it processes the data correctly.
Once the service is ready, you move to the next step of testing the integration.
Step 3: Testing the integration
Once your SuiteScript and webhook are set up, you’ll want to test the full flow.
1. Create a sales order in NetSuite:
- Go to Transactions > Sales > Enter Sales Orders > New.
- Fill out the sales order details and save it.
2. Monitor the logs in NetSuite: Check the SuiteScript execution logs (Customization > Scripting > Script Logs) to ensure the script runs without errors.
3. Verify the webhook received the data: Check your webhook logs or console output to confirm it received the sales order data.
Common challenges and how to overcome them
Here’s a list of common challenges that we often face when working with Netsutie API. Let's see how can this be resolved:
1. API rate limits: NetSuite imposes strict limits on API calls, and exceeding them can disrupt synchronization. To work around this, batch requests, filter data to fetch only what’s needed, monitor usage, and cache frequently accessed information to reduce the number of calls.
2. Error handling and data validation: Errors often arise due to data inconsistencies or invalid formats, leading to failed API calls. The solution is to pre-validate data, log errors for debugging, and implement retry mechanisms with exponential backoff to handle transient issues effectively.
3. Authentication issues: Expired tokens or incorrect credentials can cause authentication failures and interrupt workflows. To prevent this, regularly rotate tokens, assign appropriate roles with limited permissions, and double-check all credentials for accuracy.
4. Latency and performance bottlenecks: High latency from the API or network can slow down real-time synchronization. Optimize API calls to retrieve only necessary data, replace polling with webhooks for instant updates, and distribute requests across multiple instances to reduce bottlenecks.
5. Handling large data volumes: Syncing large datasets can result in timeouts and strain the system. Use pagination to process data in smaller chunks, schedule bulk updates during off-peak hours, and compress data to minimize payload sizes.
6. Limited debugging tools: Troubleshooting NetSuite API issues can be challenging due to limited error messages and diagnostics. Enable detailed logs, utilize third-party tools like Postman, and engage with developer communities to access shared solutions and advice.
While it is expected to run into issues when working with NetSuite API, if we follow the right technical strategies shared above we can overcome the common challenges.
Conclusion
The NetSuite API is an ideal option for connecting NetSuite with external systems and automating tasks. It may seem a bit complicated at first, but once broken down into simple steps such as authentication, testing, and including Suitescript it becomes much easier and maintainable. Whether you are syncing customer data, automating order processing, or creating live dashboards, NetSuite API will come in handy.