

What are smart contracts?
Smart contracts are digital agreements that automatically execute when specific conditions are met. They act as automated, trustless intermediaries, ensuring that both parties in a deal fulfill their obligations without needing a third party to oversee the transaction. For instance, if you're purchasing a concert ticket online, you can create a smart contract to handle the transaction. You set up the agreement so that when you pay for the ticket, the smart contract automatically issues the digital ticket once the payment is confirmed. If the payment isn't received, the ticket isn’t sent. This entire process is automated and transparent, removing the need for a ticket agent or platform to manage the transaction.
Smart contracts operate on blockchain technology, which functions as a secure, unchangeable digital ledger that records transactions. This ensures that the terms of the agreement are clear and immutable, making transactions both trustworthy and efficient. JavaScript blockchain can be used to create a smart contract and interact with it on the blockchain, enabling developers to build decentralized applications that leverage these automated agreements.
Overview
This blog article will walk you through the steps to create a smart contract for a simple voting application. By the end, you'll know how to create, compile, deploy, and interact with a smart contract using JavaScript blockchain & web3.js, laying a strong foundation for further blockchain development.
Steps we'll cover:
- Create a smart contract: We'll start by writing a basic voting contract in Solidity and save it in a file named myVotingContract.sol.
- Compiling the smart contract: Next, we'll create a compile.js script to compile the smart contract using the Solidity compiler.
- Setting up the development environment: We'll use Node.js, web3.js, JavaScript blockchain, and Hardhat to set up our development environment and connect to a local blockchain network.
- Deploying the smart contract: Then, we'll write a deploy.js script to deploy the compiled smart contract to the blockchain.
- Creating a user interface: Finally, we'll build a simple HTML interface to interact with the smart contract using JavaScript blockchain, allowing users to load candidates and cast their votes.
What you'll gain
By following this tutorial, you'll gain hands-on experience in creating, compiling, deploying, and interacting with a smart contract using javascript blockchain, and web3.js. This will provide you with a strong foundation for further blockchain development.
Prerequisites
Before diving into the code, ensure you have the following prerequisites:
- Basic knowledge of JavaScript: Familiarity with JavaScript and its asynchronous nature.
- Node.js installed: Ensure you have Node.js installed on your machine. You can download it from nodejs.org.
- Prior knowledge of Solana (optional): Having some understanding of Solana is beneficial but not required.
Step 1: Project creation
First, create a new directory for your project and navigate into it:
mkdir smart-contract-voting-demo
cd smart-contract-voting-demo
Next, initialize a new Node.js project
npm init -yStep 2: Create a smart contract
Now open this directory in your favorite IDE, I am using vscode.
Create a file named MyVotingContract.sol:
// SPDX-License-Identifier: MIT
pragma solidity ^0.8.0;

contract MyVotingContract {
    // Mapping from candidate names to vote counts to create a smart contract
    mapping(string => uint256) public votesReceived;
    // Array to store all candidate names
    string[] public candidateList;

    // Constructor to initialize the contract with a list of candidates
    constructor(string[] memory _candidates) {
        candidateList = _candidates;
        // Initialize votes for each candidate to 0
        for (uint i = 0; i < _candidates.length; i++) {
            votesReceived[_candidates[i]] = 0;
        }
    }

    // Function to vote for a candidate
    function voteForCandidate(string memory candidate) public {
        require(votesReceived[candidate] >= 0, "Candidate does not exist");
        votesReceived[candidate] += 1;
    }

    // Function to get the total number of votes for a candidate
    function totalVotesFor(string memory candidate) public view returns (uint256) {
        require(votesReceived[candidate] >= 0, "Candidate does not exist");
        return votesReceived[candidate];
    }

    // Function to get the list of candidates
    function getCandidates() public view returns (string[] memory) {
        return candidateList;
    }
In this Solidity smart contract, we implemented a simple voting system. Here's a breakdown of what we've done:
- Maption: We cping and array initializareate a smart contract to associate candidate names with their respective vote counts and an array to store all candidate names. This helps us keep track of the votes each candidate receives.
- Constructor: In the constructor, we initialized the contract with a list of candidates. We set the initial vote count for each candidate to zero. This ensures that every candidate starts with a clean slate.
- Voting function: We added a function called voteForCandidate that allows users to vote for their preferred candidate. The function checks if the candidate exists and then increments their vote count by one.
- Total votes function: The totalVotesFor function retrieves the total number of votes a candidate has received. This is useful for checking the vote count at any given time.
- Get candidates function: Lastly, we included a getCandidates function to return the list of all candidates. This allows us to see who is participating in the election.
Step 3: Compile the smart contract using the javascript blockchain
To compile your smart contract, you can use the Solidity compiler. You can install it via npm:
npm i solc@^0.8.0Create a file named compile.js in your project root:
const solc = require("solc");
const path = require("path");
const fs = require("fs");
const contractName = "MyVotingContract";
const fileName = `${contractName}.sol`;
// Read the Solidity source code from the file system using javascript blockchain
const contractPath = path.join(__dirname, fileName);
const sourceCode = fs.readFileSync(contractPath, "utf8");
// solc compiler config
const input = {
language: "Solidity",
sources: {
[fileName]: {
content: sourceCode,
},
},
settings: {
outputSelection: {
"*": {
"*": ["*"],
},
},
},
};
// Compile the Solidity code using solc in javascript blockchain env
const compiledCode = JSON.parse(solc.compile(JSON.stringify(input)));
// Get the bytecode from the compiled contract using the javascript blockchain
const bytecode =
compiledCode.contracts[fileName][contractName].evm.bytecode.object;
// Write the bytecode to a new file
const bytecodePath = path.join(__dirname, "MyVotingContractBytecode.bin");
fs.writeFileSync(bytecodePath, bytecode);
// Log the compiled contract code to the console
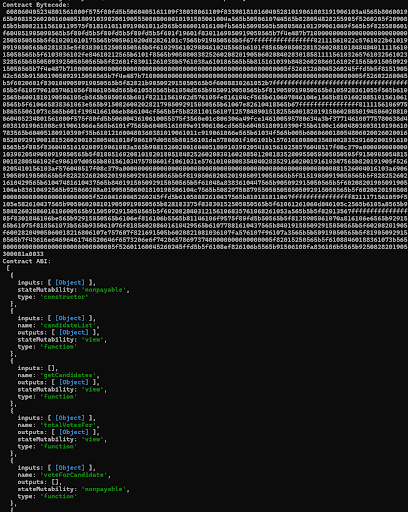
console.log("Contract Bytecode:\n", bytecode);
// Get the ABI from the compiled contract in javascript blockchain env
const abi = compiledCode.contracts[fileName][contractName].abi;
// Write the Contract ABI to a new file
const abiPath = path.join(__dirname, "MyVotingContractAbi.json");
fs.writeFileSync(abiPath, JSON.stringify(abi, null, "\t"));
// Log the Contract ABI to the console
console.log("Contract ABI:\n", abi);In this file, we have written code to create a smart contract by compiling a Solidity smart contract and extracting its bytecode and ABI using the solc compiler. We start by requiring necessary modules (solc, path, and fs) and reading the Solidity source code from a file named MyVotingContract.sol.
We then set up the compiler input configuration, specifying the language, sources, and desired output settings. Using solc, we compile the Solidity code to create a smart contract and extract the bytecode and ABI (Application Binary Interface) from the compiled contract.
Finally, we write the bytecode and ABI to separate files (MyVotingContractBytecode.bin and MyVotingContractAbi.json) and log them to the console. This approach provides a straightforward way to compile and retrieve essential contract data for deployment and interaction, leveraging JavaScript blockchain tools for efficient smart contract management.
Run the compilation script:
npm i solc@^0.8.0Create a file named compile.js in your project root:
const solc = require("solc");
const path = require("path");
const fs = require("fs");

const contractName = "MyVotingContract";
const fileName = `${contractName}.sol`;

// Read the Solidity source code from the file system using javascript blockchain
const contractPath = path.join(__dirname, fileName);
const sourceCode = fs.readFileSync(contractPath, "utf8");

// solc compiler config
const input = {
  language: "Solidity",
  sources: {
    [fileName]: {
      content: sourceCode,
    },
  },
  settings: {
    outputSelection: {
      "*": {
        "*": ["*"],
      },
    },
  },
};

// Compile the Solidity code using solc in javascript blockchain env
const compiledCode = JSON.parse(solc.compile(JSON.stringify(input)));

// Get the bytecode from the compiled contract using the javascript blockchain
const bytecode =
  compiledCode.contracts[fileName][contractName].evm.bytecode.object;

// Write the bytecode to a new file
const bytecodePath = path.join(__dirname, "MyVotingContractBytecode.bin");
fs.writeFileSync(bytecodePath, bytecode);

// Log the compiled contract code to the console
console.log("Contract Bytecode:\n", bytecode);

// Get the ABI from the compiled contract in javascript blockchain env
const abi = compiledCode.contracts[fileName][contractName].abi;

// Write the Contract ABI to a new file
const abiPath = path.join(__dirname, "MyVotingContractAbi.json");
fs.writeFileSync(abiPath, JSON.stringify(abi, null, "\t"));

// Log the Contract ABI to the console
console.log("Contract ABI:\n", abi);
node compile.jsIn this file, we have written code to create a smart contract by compiling a Solidity smart contract and extracting its bytecode and ABI using the solc compiler. We start by requiring necessary modules (solc, path, and fs) and reading the Solidity source code from a file named MyVotingContract.sol. We then set up the compiler input configuration, specifying the language, sources, and desired output settings. Using solc, we compile the Solidity code to create a smart contract and extract the bytecode and ABI (Application Binary Interface) from the compiled contract. Finally, we write the bytecode and ABI to separate files (MyVotingContractBytecode.bin and MyVotingContractAbi.json) and log them to the console. This approach provides a straightforward way to compile and retrieve essential contract data for deployment and interaction, leveraging JavaScript blockchain tools for efficient smart contract management.
Run the compilation script:
If everything works correctly, you should see the contract's bytecode and ABI logged to the console and two new files (MyFirstContractAbi.json and MyFirstContractBytecode.bin) in the project directory.
Step 4: Set up web3.js and Hardhat
In this step, we'll set up web3.js and Hardhat. web3.js is a JavaScript library that enables you to interact with the Ethereum blockchain. It provides an API to interact with smart contracts, send transactions, and manage user accounts. As a key tool for JavaScript blockchain development, web3.js is essential for building decentralized applications (dApps) that communicate with the blockchain and create a smart contract.
Hardhat is a development environment for compiling, deploying, testing, and debugging Ethereum smart contracts. It provides a flexible and extensible framework to manage smart contract projects, including the ability to create a smart contract. Hardhat supports plugins, making it easy to customize and automate your workflow in JavaScript blockchain projects.
First, install the web3 & hardhat packages with npm:
npm i web3 hardhat
Next, initialize the Hardhat project:
npx hardhat initWhen initializing the Hardhat project, you will be prompted to respond to several questions—select the default option for each. After initialization, several new files and directories will be generated. Please refer to hardhat official docs here.
To start the Hardhat development network, execute the following command:
npx hardhat nodeExecuting this command will start a local Ethereum network, providing the URL for connecting to the network as well as several pre-funded test accounts that can be used for development and testing purposes. This will help us in setting up the javascript blockchain environment.
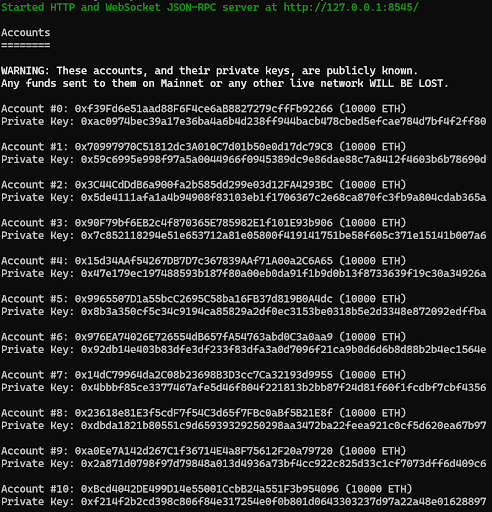
Here above we can see URL http://127.0.0.1:8545/ is provided to connect to the Ethereum network.
The Hardhat development network must remain running in the terminal where it was started. To execute the remaining commands in this tutorial, open a new terminal instance within the project directory.
Next, create a new file called index.js in your project directory and add the following code to it:
const { web3 } = require("web3");

const web3 = new web3("http://127.0.0.1:8545/");

// Log the chain ID to the console to check the javascript blockchain setup
web3.eth
    .getChainId()
    .then((result) => {
        console.log("Chain ID: " + result);
    })
    .catch((error) => {
        console.error(error);
    });
This code sets up a web3.js connection to the Hardhat development network and logs the chain ID to the console.
Run the following command to test the connection:
node index.jsIf everything is working correctly, you should see the chain ID logged to the console:
Chain ID: 31337
If you see the Chain ID in the console, it confirms that Hardhat is running correctly for your JavaScript blockchain setup, and you can proceed with the next steps to create a smart contract. If you encounter any errors, check the logs in the terminal where you started Hardhat to troubleshoot any issues in your JavaScript blockchain environment.
Step 5: Deploy the smart contract with web3.js
Now, create a new file named deploy.js in your project root:
const { web3 } = require("web3");
const path = require("path");
const fs = require("fs");
const abi = require("./MyVotingContractAbi.json"); // Importing the ABI (Application Binary Interface) for the contract

const web3 = new web3("http://127.0.0.1:8545/"); // Creating a new instance of web3 and connecting to the local Ethereum node in javascript blockchain env

const bytecodePath = path.join(__dirname, "MyVotingContractBytecode.bin"); // Path to the bytecode file
const bytecode = fs.readFileSync(bytecodePath, "utf8"); // Reading the bytecode from the file

const simpleVotingContract = new web3.eth.Contract(abi); // Creating a new instance of the contract using the ABI
simpleVotingContract.handleRevert = true; // Setting the handleRevert property to true to handle revert errors

async function deploy() {
  const accounts = await web3.eth.getAccounts(); // Getting the list of accounts
  const defaultAccount = accounts[0]; // Selecting the first account as the deployer account
  console.log("Deployer account:", defaultAccount);

  const contractDeployer = simpleVotingContract.deploy({
    data: "0x" + bytecode,
    arguments: [["Candidate1", "Candidate2", "Candidate3"]], // Example candidates
  });

  const gas = await contractDeployer.estimateGas({
    from: defaultAccount,
  });
      console.log("Estimated gas:", gas);

  try {
    const tx = await contractDeployer.send({
      from: defaultAccount,
      gas,
      gasPrice: "10000000000",
    });
    console.log("Contract deployed at address: " + tx.options.address);

    const deployedAddressPath = path.join(
      __dirname,
      "MyVotingContractAddress.txt"
    );
    fs.writeFileSync(deployedAddressPath, tx.options.address); // Writing the deployed contract address to a file
  } catch (error) {
    console.error(error);
  }
}

deploy();
The purpose of this file is to create a smart contract for a voting system and deploy it using web3.js, a key component in JavaScript blockchain development. Here, we import the necessary modules and connect to a local Ethereum node. We read the contract's ABI and bytecode and create an instance of the contract. The deployment function retrieves the list of Ethereum accounts, selects the first account as the deployer, and sets up the contract deployment with example candidates. We estimate the gas required, deploy the contract and write the deployed contract address to a file. This script ensures a smooth deployment process by handling potential revert errors, making it a crucial step in managing your JavaScript blockchain project.
Step 6: Run the deployment script
node deploy.jsIf successful, you should see the address of your deployed contract.

Step 7: Create a UI to interact with the smart contract
Create a new file named clientApp.html. Although you're using HTML and JavaScript, you can opt for any framework you prefer. Add the below code to this file.
<!DOCTYPE html>
<html lang="en">
  <head>
    <meta charset="UTF-8" />
    <meta name="viewport" content="width=device-width, initial-scale=1.0" />
    <title>Voting Application</title>
    <style>
      body {
        font-family: Arial, sans-serif;
        background: #121212;
        margin: 0;
        padding: 0;
        display: flex;
        justify-content: center;
        align-items: center;
        height: 100vh;
      }
      .container {
        background: #1e1e1e;
        border-radius: 10px;
        box-shadow: 0 4px 8px rgba(0, 0, 0, 0.3);
        width: 100%;
        max-width: 600px;
        padding: 30px;
        text-align: center;
        box-sizing: border-box;
      }
      h1 {
        color: #ffffff;
        margin-bottom: 30px;
        font-size: 24px;
      }
      button {
        padding: 12px 20px;
        border: none;
        border-radius: 5px;
        background-color: #007bff;
        color: #ffffff;
        font-size: 16px;
        cursor: pointer;
        transition: background-color 0.3s ease;
        margin: 10px;
      }
      button:hover {
        background-color: #0056b3;
      }
      select {
        padding: 10px;
        border: 1px solid #444;
        border-radius: 5px;
        font-size: 16px;
        background-color: #2a2a2a;
        color: #ffffff;
        margin: 10px;
      }
      .result {
        margin-top: 20px;
        padding: 15px;
        background-color: #2a2a2a;
        border: 1px solid #444;
        border-radius: 5px;
        color: #ffffff;
        text-align: left;
        white-space: pre-wrap;
        max-height: 300px;
        overflow-y: auto;
      }
      .error {
        color: #e3342f;
      }
      .candidate-list {
        margin: 20px 0;
        text-align: left;
      }
    </style>
    <script src="https://cdn.jsdelivr.net/npm/[email protected]/dist/web3.min.js"></script>
  </head>
  <body>
    <div class="container">
      <h1>Voting Application</h1>
      <button id="loadCandidatesButton">Load Candidates</button>
      <div id="candidatesContainer">
        <select id="candidatesSelect">
          <option value="" disabled selected>Select a candidate</option>
        </select>
        <button id="voteButton">Vote</button>
      </div>
      <div class="result" id="result"></div>
    </div>

    <script>
      // Initialize web3 using javascript blockchain functions to create a smart contract
      const web3 = new web3("http://127.0.0.1:8545/");

      // Function to load ABI and contract address in the javascript blockchain environment
      async function loadContractData() {
        try {
          const abiResponse = await fetch("./MyVotingContractAbi.json");
          const abi = await abiResponse.json();

          const addressResponse = await fetch("./MyVotingContractAddress.txt");
          const address = await addressResponse.text();

          // Ensure address is trimmed
          const trimmedAddress = address.trim();

          return { abi, address: trimmedAddress };
        } catch (error) {
          console.error("Error loading contract data:", error);
          throw error;
        }
      }

      // Function to load candidates
      async function loadCandidates() {
        try {
          const { abi, address } = await loadContractData();
          const contract = new web3.eth.Contract(abi, address);

          // Get the list of candidates
          const candidates = await contract.methods.getCandidates().call();

          // Populate the candidates dropdown
          const selectElement = document.getElementById("candidatesSelect");
          selectElement.innerHTML =
            '<option value="" disabled selected>Select a candidate</option>';
          candidates.forEach((candidate) => {
            const option = document.createElement("option");
            option.value = candidate;
            option.textContent = candidate;
            selectElement.appendChild(option);
          });

          // Fetch and display votes for all candidates
          const votesList = await Promise.all(
            candidates.map((candidate) =>
              contract.methods
                .totalVotesFor(candidate)
                .call()
                .then((votes) => ({ candidate, votes }))
            )
          );

          let resultText = "Candidates and their votes:\n";
          votesList.forEach(({ candidate, votes }) => {
            resultText += `${candidate}: ${votes} votes\n`;
          });
          document.getElementById("result").innerText = resultText;
        } catch (error) {
          console.error(error);
          document.getElementById(
            "result"
          ).innerText = `Error: ${error.message}`;
          document.getElementById("result").classList.add("error");
        }
      }

      // Function to vote for a candidate
      async function voteForCandidate() {
        try {
          const { abi, address } = await loadContractData();
          const contract = new web3.eth.Contract(abi, address);

          const accounts = await web3.eth.getAccounts();
          const defaultAccount = accounts[0];

          const candidate = document.getElementById("candidatesSelect").value;
          if (!candidate) {
            document.getElementById("result").innerText =
              "Please select a candidate.";
            return;
          }

          // Cast a vote for the selected candidate
          const receipt = await contract.methods
            .voteForCandidate(candidate)
            .send({
              from: defaultAccount,
              gas: 1000000,
              gasPrice: "10000000000",
            });
          console.log("Transaction Hash: " + receipt.transactionHash);

          // Update votes for all candidates
          await loadCandidates(); // Refresh the list of candidates and votes
        } catch (error) {
          console.error(error);
          document.getElementById(
            "result"
          ).innerText = `Error: ${error.message}`;
          document.getElementById("result").classList.add("error");
        }
      }

      // Add event listeners to buttons
      document
        .getElementById("loadCandidatesButton")
        .addEventListener("click", loadCandidates);
      document
        .getElementById("voteButton")
        .addEventListener("click", voteForCandidate);
    </script>
  </body>
</html>
The HTML file provides a user interface to interact with the SimpleVoting smart contract on a local Ethereum network. It allows users to fetch the list of candidates and their vote counts from the contract by clicking the "Load Candidates" button. This action triggers a function that retrieves the candidate data and updates the interface with their names and current vote tallies. Additionally, users can vote for a candidate using the "Vote" button. This button sends a transaction to the smart contract to record the user's vote for the selected candidate and demonstrates how to create a smart contract.
The interface includes a dropdown menu for candidate selection, which is dynamically populated with candidates from the smart contract. The results, including vote counts and any error messages, are displayed in a dedicated section of the UI, providing a seamless experience for interacting with your JavaScript blockchain project.
Step 8: Run UI to interact with the smart contract
To run an HTML file independently, you'll need to install the http-server package. Open the command prompt and execute the following command to install it.
npm install -g http-serverOnce this is installed, you can navigate to the root directory of the project and run the command below:
http-serverOnce you run the above command, you will see below details of the local http server running:
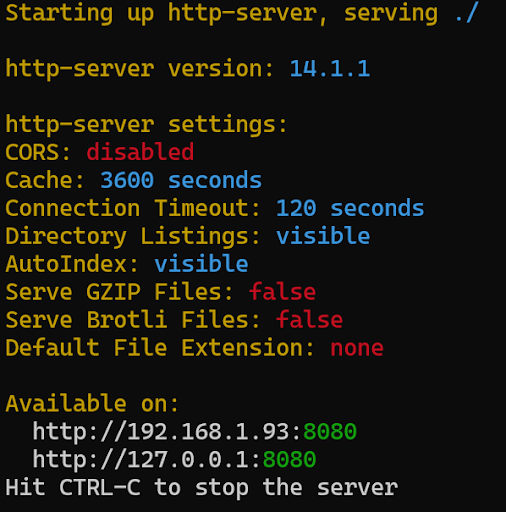
Navigate to the URL & open clientApp.html, you should see a UI similar to this:
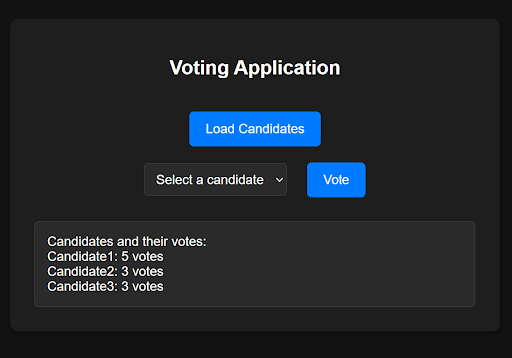
Here you first have to click on the Load Candidates button that will load all the candidates with their current vote count.
Next, simply select a candidate and click on “Vote”. This will vote the candidate and you can see the list below in the the list.
In this voting application, the smart contract manages the voting logic through methods like getCandidates, totalVotesFor, and voteForCandidate. The ABI (Application Binary Interface) and contract address define how to interact with this contract and its deployment location. web3.js, a key tool in JavaScript blockchain development, enables your application to communicate with the blockchain, allowing it to send transactions and interact with the smart contract you create a smart contract.
These transactions, which update the contract’s state (such as casting a vote), are signed by user accounts and incur gas fees for processing. The Ethereum blockchain records all transactions and state changes in a decentralized ledger, with gas fees paid to miners for including these transactions in blocks. Hardhat is used during development to provide a local Ethereum environment for deploying and testing contracts, simulating interactions before live deployment, and ensuring a smooth JavaScript blockchain workflow.
Conclusion
Congratulations! You’ve successfully created, deployed, and interacted with a smart contract using web3.js. This tutorial demonstrated the process of how to set up your javascript blockchain development environment to write and create a smart contract.
Next steps
Now that you have a basic understanding of how to create a smart contract with JavaScript blockchain, consider exploring more advanced topics, such as:
Events and listeners: Learn how to emit and listen for events in your smart contract using JavaScript blockchain.
Testing smart contracts: Explore tools like Mocha and Chai to test your smart contracts effectively within the JavaScript blockchain environment.
Using a test network: Once comfortable, deploy your smart contracts on Ethereum's test networks like Rinkeby or Ropsten.
With this foundation, you’re well on your way to becoming proficient in creating smart contracts and JavaScript blockchain development.
Resources
- web3js docs, web3js docs
- Solana docs, Solana official docs
- Hardhat, hardhat official docs