Modern technologies and tools have revolutionized the process of real-time communication, making it easier than ever to bring real-time chat functionality to your web applications. In this article, we will explore the step-by-step process that will guide you through developing a real-time chat system using Django, a popular Python web framework.
Why Use a Real-Time Chat System?
Real-time chat systems enable instantaneous communication between users and can be a powerful addition to various applications, from customer support to social networking. The following are some of the benefits of the Real-time chat system:
- Enhanced User Engagement: Real-time communication fosters active engagement and interaction among users, leading to a better user experience.
- Instantaneous Information Exchange: A real-time system helps users to exchange information and messages instantly, improving efficiency and productivity.
- Collaborative Environments: Real-time chat facilitates collaboration within a platform, enabling teams to work together more effectively.
- Improved Customer Support: Real-time chat allows swift assistance, improving customer satisfaction for the applications that provide customer support
Building a Real-Time Chat System with Django
Let's dive into the steps to create a real-time chat system using Django. In this comprehensive guide, we'll cover the setup, models, Django Channels configuration, consumers, routing, integrating chat functionality, testing, and deployment.
Prerequisites
- Python is installed on your local machine.
- Django is installed on your local machine.
- A text editor installed, e.g., VsCode.
- Basic knowledge of HTML, CSS, JavaScript, and the terminal.
- Basic knowledge of Python
Set Up a Django Project and App
Before starting, if you don’t have Django installed on your local machine, then you can run this command to install Django:
pip install Django
Let's now start by creating a new Django project and a dedicated app for the chat system. We will call this app “DjangoChat”.
django-admin startproject DjangoChatThe command provided will create a fresh Django project within a directory containing your project's name, which, in this case, is DjangoChat.
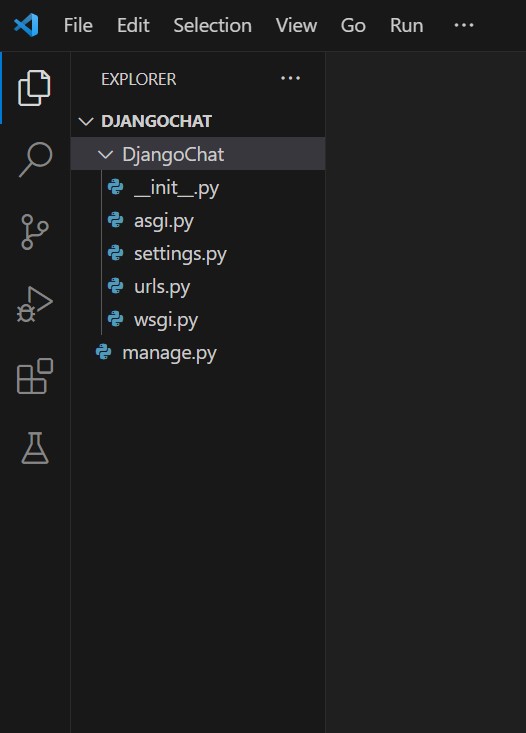
cd DjangoChatOpen this in your favorite IDE, I am using vscode. Once your project is set, the project structure should look like this:
Channels setup
Channels help us to create a socket application and enable us to do real-time chat applications. Channels in Django help maintain the normal synchronous behavior of the framework while also allowing for asynchronous protocols. This means developers can create views that are either synchronous, asynchronous, or a mix of both. Channels enable applications to handle "long-running connections," which can be crucial for tasks like real-time updates.
python -m pip install -U channels For this tutorial, we will be using Channels. We also need Daphne to make the channel work in development mode, which can be installed using the below command:
python -m pip install -U daphneAdd to settings.py
Now that we have installed our dependencies let us add them inside the INSTALLED_APPS section of our settings.py file.
>> DjangoChat/settings.py INSTALLED_APPS = [
<br></br>
'django.contrib.admin',
'django.contrib.auth',
'django.contrib.contenttypes',
'django.contrib.sessions',
'django.contrib.messages',
# Daphne must be listed before django.contrib.staticfiles
'daphne',
'django.contrib.staticfiles',
# Adding the newly installed dependencies
'channels'
]It is important to add channels to the end of the INSTALLED_APPS list so that it doesn’t interfere with other apps.
Also, we need to set the ASGI application to the default ASGI file in the project. ASGI (Asynchronous Server Gateway Interface) serves as a bridge between async Python web servers and applications. It offers all the functionalities of WSGI but is tailored for asynchronous operations.
Open settings.py and add the below line to the end of the file:
ASGI_APPLICATION = 'DjangoChat.asgi.application'This sets the ASGI_APPLICATION value to point to the ASGI application of the current Django application named 'DjangoChat'.
Checkpoint
Let us now check if we are on the right track. Run the application using the command below:
python manage.py runserverAfter running this command, you should see the application running on port 8000. If any port-related errors occur, ensure that port 8000 is not already in use.

Once you start the server, you'll observe that the ASGI server will take precedence over the Django server, thereby providing ASGI support.
Now we have our basic project setup ready. It is time to add the relevant files required for our chat application.
Create chat application
Now we will create a new project that will handle all chat-related functionalities, and we'll call it "ChitChat" or choose a name that suits your preferences or business needs. To create this new application, simply run the following command:
python manage.py startapp ChitChatAfter creating the application, the folder structure will look like this:
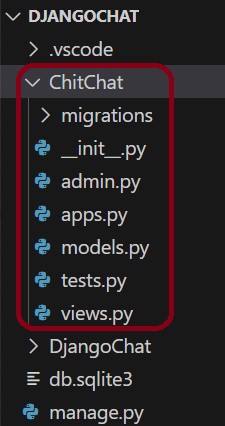
As you can see above, we have a new folder created with the project name, this project will handle all the chat functionality.
Register the application and add channels
After creating a new chat application, we have to register it in the settings.py of the main application. We can do that by adding ‘ChitChat.apps.ChitchatConfig' to the top of the INSTALLED_APPS section.
DjangoChat/settings.pyINSTALLED_APPS = [
#on the top register your application
'ChitChat.apps.ChitchatConfig',
'django.contrib.admin',
'django.contrib.auth',
'django.contrib.contenttypes',
'django.contrib.sessions',
'django.contrib.messages',
# Daphne must be listed before django.contrib.staticfiles
'daphne',
'django.contrib.staticfiles',
# Adding the newly installed dependencies
'channels'
]Note on the top we have registered our application.
Now we must add the CHANNEL_LAYERS setting in the Django settings.py file for handling real-time functionality, such as WebSocket communication. This setting specifies how Django Channels should handle channel layers, which are a key component for managing asynchronous messaging.
In the settings.py file at the end, configure CHANEL_LAYERS as below:
>>DjangoChat/settings.pyCHANNEL_LAYERS = {
"default": {
"BACKEND": "channels.layers.InMemoryChannelLayer"
}
}Here, we are using an in-memory channel layer backend, specified as channels.layers.InMemoryChannelLayer. This means we use an in-memory storage system to handle channels and messages.
In production environments or for larger applications, you might use more advanced channel layer backends like Redis or another message broker to handle the distribution of messages and WebSocket events.
Include the redirect URLs for both login and logout in the same file. We will cover the code for handling the login and logout processes in a subsequent section of this article.
>>DjangoChat/settings.py
 <br></br>
LOGIN_REDIRECT_URL = "chat-page"
LOGOUT_REDIRECT_URL = "login-user"
Add routing to call our chat application
Since we have created our chat application, it is time to add routing to our main application so that it can call the chat application.
>> DjangoChat/urls.pyfrom django.contrib import admin
from django.urls import include, path
urlpatterns = [
    path('admin/', admin.site.urls),
    path("", include("ChitChat.urls")),
]
Add URLs to our chat app
Our chat application will have a login page and chat page. Users will need to log in before they can access the application.
To handle this, we have to create some URLs which will be used for the application's routing.
In the ChitChat folder, create a new file, urls.py:
>> ChitChat/urls.pyfrom django.urls import path, include
from ChitChat import views as chat_views
from django.contrib.auth.views import LoginView, LogoutView
urlpatterns = [
path("", chat_views.chatPage, name="chat-page"),
# authentication section
path("auth/login/", LoginView.as_view
(template_name="chat/loginPage.html"), name="login-user"),
path("auth/logout/", LogoutView.as_view(), name="logout-user"),
]Here we are creating URLs for our ChitChat application, we have added URLs that will redirect us to the login and logout page as well as the main chat page.
We will now create our HTML files which will be responsible for showing the results on the browser.
Create templates for the chat application
Templates in Django are text files containing HTML code mixed with Django template language elements. They are used to generate dynamic web content by rendering data from the database in a user-friendly format. Let’s create a new folder inside our ChitChat application and name it templates. Inside the templates folder, let’s create another folder named “chat”. We will be placing all the templates related to chat in this folder. First, we need a login page to write all our code related to login functionality. Create a new file and name it as loginPage.html
>> ChiChat/templates/chat/loginPage.html<!DOCTYPE html>
<html>
<head>
<style>
body {
background-color: #f0f0f0;
font-family: Arial, sans-serif;
display: flex;
justify-content: center;
align-items: center;
height: 100vh;
width: 100vw;
margin: 0;
}
form {
max-width: 300px;
padding: 20px;
background-color: #fff;
border-radius: 8px;
box-shadow: 0 0 10px rgba(0, 0, 0, 0.1);
/* text-align: center; */
display: flex;
flex-direction: column;
align-items: center;
}
.branding {
margin-bottom: 20px;
font-size: 24px;
font-weight: bold;
color: #128C7E;
/* ChitChat brand color */
}
.btn-container {
text-align: center;
}
button {
background-color: #128C7E;
color: #fff;
border: none;
padding: 10px 20px;
border-radius: 4px;
cursor: pointer;
}
button:hover {
background-color: #075e54;
}
label {
font-weight: bold;
text-align: left;
width: 85%;
}
input[type="text"],
input[type="password"] {
width: 80%;
padding: 10px;
margin-bottom: 10px;
border: 1px solid #ccc;
border-radius: 4px;
}
</style>
</head>
<body>
<form method="post">
{% csrf_token %}
<div class="branding">Chit-Chat</div>
{{form.as_p}}
<div class="btn-container">
<button type="submit">Login</button>
</div>
</form>
</body>
</html>Here we have CSS and HTML for our login page. Once the user clicks on the submit button Django will validate the user credentials and upon success, it will redirect to the chat page.
{% csrf_token %} is a template tag in Django that inserts a hidden input field containing a security token in a form. This token helps protect against cross-site request forgery (CSRF) attacks by ensuring that the form submission comes from the same site and is not a malicious request from another domain.
Now create a new file chatPage.html, this file contains all the code related to chat functionality.
>> ChitChat/templates/chat/chatPage.html <!DOCTYPE html>
<html>
<head>
<link rel="stylesheet" href="https://cdnjs.cloudflare.com/ajax/libs/font-awesome/5.15.3/css/all.min.css">
<style>
body {
font-family: Arial, sans-serif;
}
.chat-container {
max-width: 400px;
margin: 0 auto;
padding: 10px;
}
.chat-header {
text-align: center;
background-color: #075e54;
color: #fff;
padding: 10px;
border-top-left-radius: 10px;
border-top-right-radius: 10px;
}
.chat-header h1 {
font-size: 24px;
}
.chat-logout {
text-align: right;
padding: 10px;
}
.chat-logout a {
text-decoration: none;
color: #075e54;
font-weight: bold;
}
.chat-logout a:hover {
text-decoration: underline;
}
.chat__item__container {
background-color: #f5f5f5;
padding: 10px;
border-radius: 10px;
height: 300px;
max-height: 300px;
/* Set a maximum height for the chat container */
overflow-y: auto;
/* Add a vertical scrollbar when needed */
}
.chat-input-container {
display: flex;
align-items: center;
}
#id_message_send_input {
flex: 1;
/* Take up available space */
padding: 5px;
border: 1px solid #ccc;
border-radius: 5px;
font-size: 16px;
}
#id_message_send_button {
padding: 5px 10px;
background-color: #075e54;
color: #fff;
border: none;
border-radius: 5px;
font-size: 16px;
cursor: pointer;
margin-left: 10px;
}
.chat-message {
background-color: #e4f9f5;
border-radius: 10px;
margin: 10px 0;
padding: 10px;
position: relative;
}
.chat-message.right {
background-color: black;
width: 80%;
float: right;
clear: both;
margin-left: auto;
margin-right: 0;
}
.chat-message.left {
background-color: #075e54;
width: 80%;
float: left;
clear: both;
margin-left: 0;
margin-right: auto;
}
.chat-message span {
font-weight: bold;
color: white;
}
.message-timestamp {
font-size: 10px;
position: absolute;
top: 5px;
right: 5px;
}
.message-username {
font-size: 12px;
position: absolute;
bottom: 5px;
right: 5px;
}
</style>
</head>
<body>
<div class="chat-container">
<div class="chat-header">
<h1>Chit-Chat <i class="fas fa-comment"></i></h1>
</div>
<div class="chat-logout">
{% if request.user.is_authenticated %}
<div style="float: left;font-weight: bold; color: #036358;">{{ request.user|title }} </div>
<div style="float: right;"><a href="{% url 'logout-user' %}"><i class="fas fa-sign-out-alt"></i></a>
</div>
<div style="clear: both;"></div>
{% endif %}
</div>
<div class="chat__item__container" id="id_chat_item_container">
<!-- Messages will be displayed here with a scrollbar -->
</div>
<div class="chat-input-container">
<input type="text" id="id_message_send_input" placeholder="Type your message..." />
<button type="submit" id="id_message_send_button"><i class="fas fa-paper-plane"></i> Send</button>
</div>
</div>
<script>
const chatSocket = new WebSocket("ws://" + window.location.host + "/");
chatSocket.onopen = function (e) {
console.log("The connection was set up successfully!");
};
chatSocket.onclose = function (e) {
console.log("Something unexpected happened!");
};
document.querySelector("#id_message_send_input").focus();
document.querySelector("#id_message_send_input").onkeyup = function (e) {
if (e.keyCode == 13) {
document.querySelector("#id_message_send_button").click();
}
};
document.querySelector("#id_message_send_button").onclick = function (e) {
var messageInput = document.querySelector("#id_message_send_input").value;
var currentTime = new Date();
var time = currentTime.toLocaleTimeString();
chatSocket.send(JSON.stringify({
message: messageInput,
username: "{{request.user.username}}",
time: time
}));
};
chatSocket.onmessage = function (e) {
const data = JSON.parse(e.data);
var messageContainer = document.querySelector("#id_chat_item_container");
var div = document.createElement("div");
div.className = (data.username === "{{request.user.username}}") ? "chat-message right" : "chat-message left";
div.innerHTML = `<div class="message-content">
<span class="message-username">${data.username.charAt(0).toUpperCase() + data.username.slice(1)}</span>
<span class="message-text">${data.message}</span>
<span class="message-timestamp">${data.time}</span>
</div>`;
document.querySelector("#id_message_send_input").value = "";
messageContainer.appendChild(div);
// Scroll to the bottom of the chat container
messageContainer.scrollTop = messageContainer.scrollHeight;
};
</script>
</body>
</html>Let’s breakdown the above code and understand what it is doing:
const chatSocket = new WebSocket("ws://" + window.location.host + "/");
This line establishes a WebSocket connection with the server. It connects to the current host (the same domain where the web page is hosted) to enable real-time communication.
chatSocket.onopen() and chatSocket.onclose()
These functions handle the WebSocket connection's open and close events. They log messages to the console to indicate whether the connection was successfully established or if something unexpected happened.
document.querySelector("#id_message_send_input").focus();
It sets focus on the message input field for user convenience.
document.querySelector("#id_message_send_input").onkeyup
This event listener captures the "Enter" key press (key code 13) and simulates a click on the send button when it happens.
document.querySelector("#id_message_send_button").onclick
When the "Send" button is clicked, this function packages the user's message, their username (from the server), and the current timestamp. It then sends this data to the WebSocket server as a JSON object.
chatSocket.onmessage()
This function handles incoming messages from the WebSocket server. It does the following:
1. Parses the received message data from JSON format.
2. Creates a message container (HTML element) based on the sender (left or right) for proper alignment.
3.* Embeds the username, message text, and timestamp into the message container.
4. Clears the input field after sending the message and scrolls the chat display to the latest message for a smooth user experience.
This JavaScript code is pivotal in achieving real-time chat functionality using WebSockets. It enables users to send and receive messages seamlessly, all within the context of the web page.
Now we have added all our HTML files.
Add Routing in the view
In the views.py file, we have to define routes on which our chat application redirects the users to. Copy the code snippet below:
>> ChitChat/views.pyfrom django.shortcuts import render, redirect
def chatPage(request, *args, **kwargs):
if not request.user.is_authenticated:
return redirect("login-user")
context = {}
return render(request, "chat/chatPage.html", context)Here, we are checking if the user is authenticated. If not, it redirects them to the login page. If the user is authenticated, it renders a chat page using a provided template.
Add Migrations
Let’s migrate our database using the command below:
python manage.py makemigrationsIf there are no changes to make, then the above command will say, “No changes detected”. It means there are no changes to be made. You can proceed with the below command.
python manage.py migrateAfter running the above command, it will run all the migrations needed to run our application.
Create a consumer for chat application
Consumers are essential components in Channels. They are event-driven units that can handle both synchronous and asynchronous applications. Consumers can run for longer durations, making them suitable for managing persistent connections like those needed for web sockets.
So far, we have added our code for the chat application, now it’s time we create a consumer.
Create a new file inside the ChitChat folder and name it consumer.py:
>> ChitChat/consumer.pyimport json
from channels.generic.websocket import AsyncWebsocketConsumer
class ChatConsumer(AsyncWebsocketConsumer):
async def connect(self):
self.roomGroupName = "group_chat"
await self.channel_layer.group_add(
self.roomGroupName,
self.channel_name
)
await self.accept()
async def disconnect(self, close_code):
await self.channel_layer.group_discard(
self.roomGroupName,
self.channel_layer
)
async def receive(self, text_data):
text_data_json = json.loads(text_data)
message = text_data_json["message"]
username = text_data_json["username"]
time = text_data_json["time"]
await self.channel_layer.group_send(
self.roomGroupName, {
"type": "sendMessage",
"message": message,
"username": username,
"time": time
})
async def sendMessage(self, event):
message = event["message"]
username = event["username"]
time = event["time"]
await self.send(text_data=json.dumps({"message": message, "username": username, "time": time}))Here we are defining a Django Channels WebSocket consumer for a chat application. When a WebSocket connection is established, it joins the consumer to a group named "group_chat" and acknowledges the connection.
When the connection is closed, it removes the consumer from the group.
WebSocket-received messages are parsed and subsequently broadcast to the group.
We have also created a custom method for sending messages, which extracts and forwards messages, usernames, and timestamps.
Routing for the consumer
It is time for us to create a routing for the consumer
Create a new file inside the ChitChat folder and name it routing.py
>> ChitChat/routing.py from django.urls import path, include
from ChitChat.consumer import ChatConsumer
# the empty string routes to ChatConsumer, which manages the chat functionality.
websocket_urlpatterns = [
path("", ChatConsumer.as_asgi()),
]Here, we are configuring Django's URL routing for WebSocket connections using Django Channels. It defines a WebSocket URL pattern that routes an empty path to a ChatConsumer using ChatConsumer.as_asgi().
This means that when a WebSocket connection is made to the application's root URL, it's handled by the ChatConsumer to manage the chat functionality. This setup is essential for enabling real-time chat features in the Django application.
Make changes to asgi.py
Open the asgi.py file and write the below code:
>> DjangoChat/asgi.py from channels.routing import ProtocolTypeRouter, URLRouter
from ChitChat import routing
from channels.auth import AuthMiddlewareStack
import os
from django.core.asgi import get_asgi_application
os.environ.setdefault('DJANGO_SETTINGS_MODULE', 'DjangoChat.settings')
application = ProtocolTypeRouter(
{
"http": get_asgi_application(),
"websocket": AuthMiddlewareStack(
URLRouter(
routing.websocket_urlpatterns
)
)
}
)In standard Django, we usually work with wsgi.py, which lacks asynchronous support. However, when we introduce asynchronous channels, routing is handled differently for WebSocket connections. In this setup, we define routes for various protocols using ProtocolTypeRouter. For HTTP requests, we continue to use the standard application. For WebSocket (ws) connections, we've introduced a new protocol.
To ensure secure WebSocket communication, we employ AuthMiddlewareStack for authentication and URLRouter to route WebSocket connections. The protocol used for WebSockets is "ws," while HTTP requests are still used for other types of communication. This configuration allows our Django project to seamlessly handle HTTP and WebSocket connections with the necessary routing and authentication..
Creating some users
Now, we are almost done here. We need to create a few users for our application to test. Use the command below:
python manage.py createsuperuserThis will create a new user for our application. I have created two users for the demo:
User 1: vinod

User 2: silvia

Testing and debugging
To run the application run the below command:
python manage.py runserverAfter running this command, you should see something like this, it means you have followed the tutorial and reached the destination.

Just run the application on the given URL http://127.0.0.1:8000/. This will launch the login page at this http://127.0.0.1:8000/auth/login/ because we have kept the login page as default when the user is not logged in.
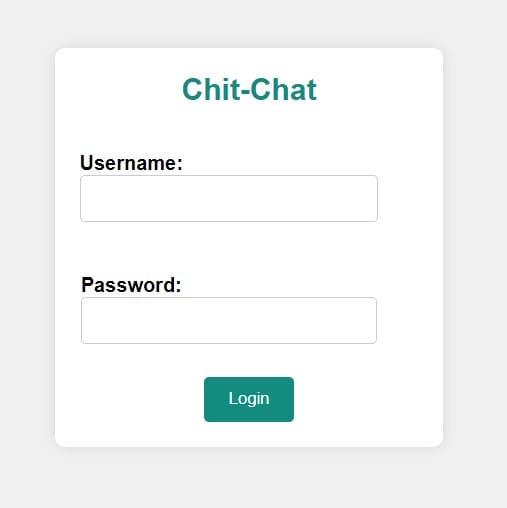
Here we have to enter the username that we created earlier and enter the password, this will redirect to the chat page.
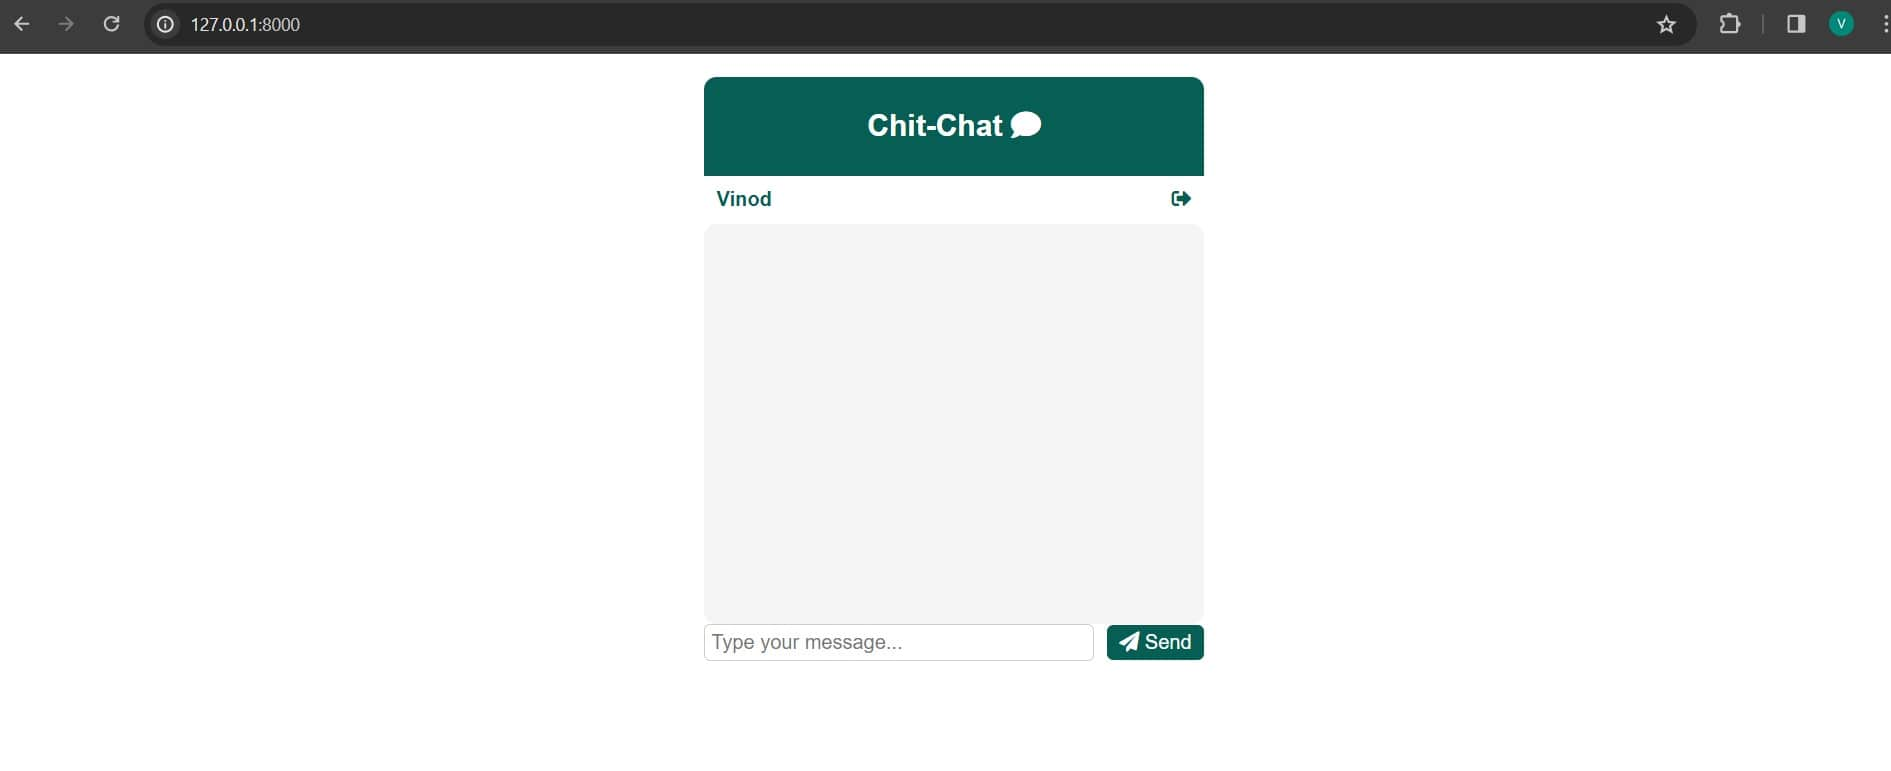
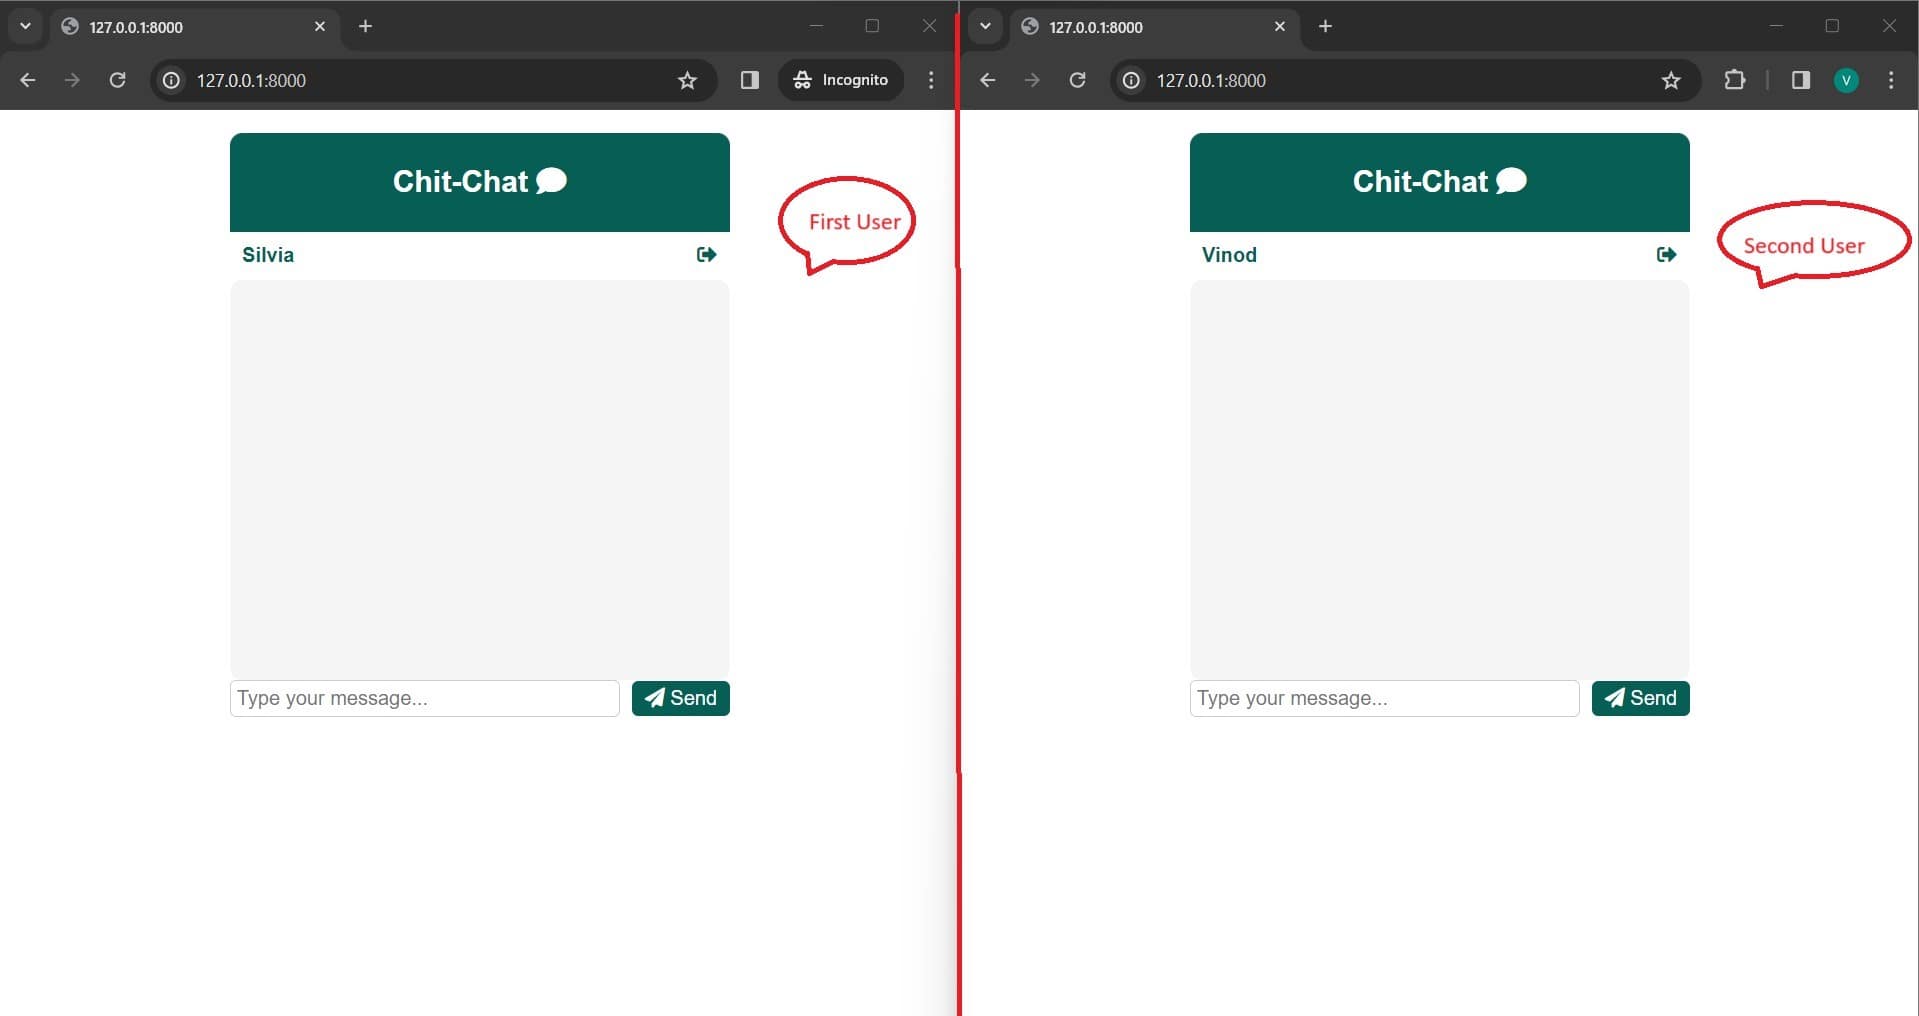
As you can see on the top right-hand side, we have the user name of the user who has logged in.
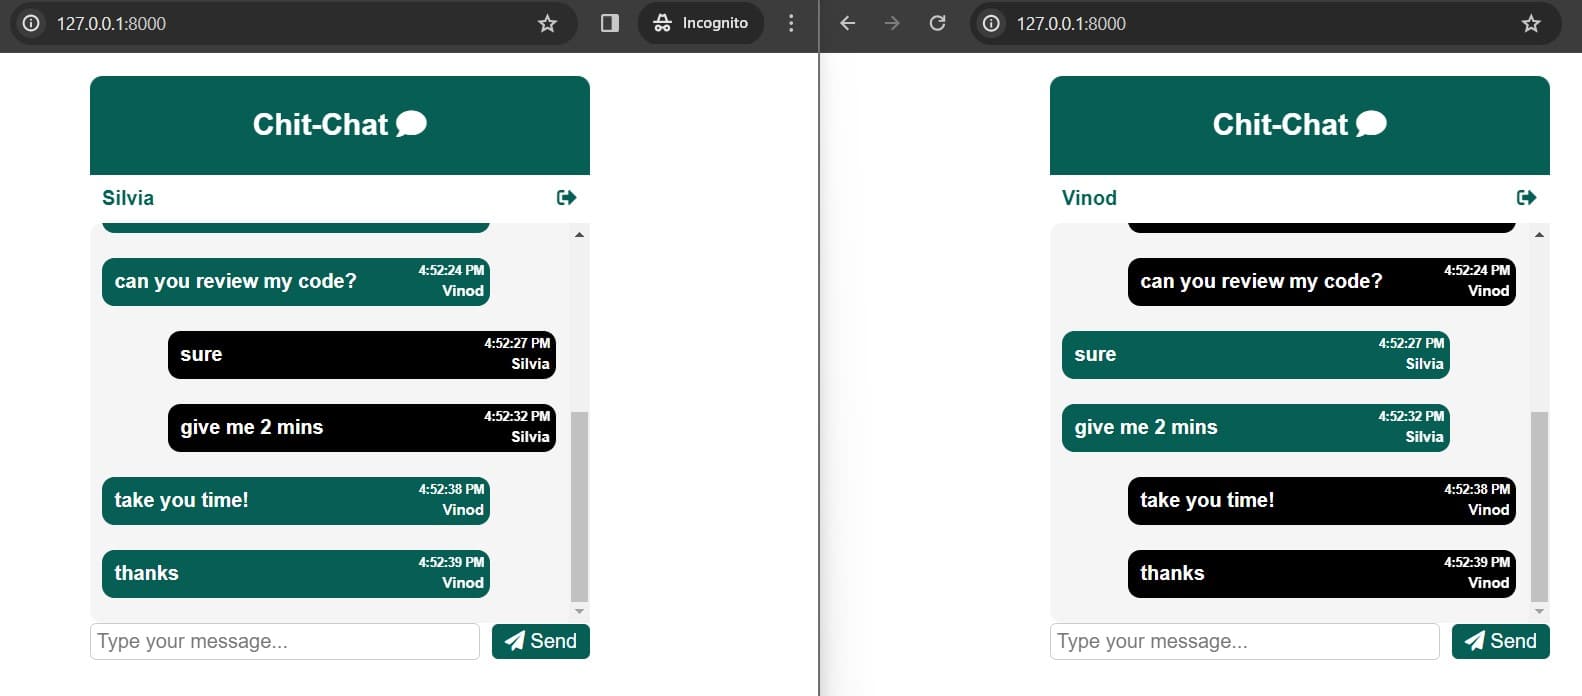
To test this, you might want to open the same URL in another browser or incognito mode of the same browser, this demonstrates how two users will talk to each other.
How to verify if it is going through webSockets?
- Open Developer Tools: Open the developer tools in your browser. You can typically do this by pressing F12 or Ctrl + Shift + I (or Cmd + Option + I on Mac) or by right-clicking on a page and selecting "Inspect" or "Inspect Element."
- Switch to network tab and apply filter on “WS”.
- Click on the request, and there you can see all the incoming and outgoing messages via Websockets.

This is it, You have now successfully developed your chat application using Django.
Next steps…
Up to this point, we've built an application that allows users to create chat rooms and join them for real-time conversations. While this was a basic implementation supporting a single-room chat, if you're interested in delving deeper into this topic, you can explore and implement advanced features that would enhance your chat application and make it more appealing to users.
Here are some advanced steps that you can do to make the most of what you learned so far:
- Add “typing…” option o Implement a feature that lets users see when others are typing a message o You can achieve this by sending a distinct message with the content "typing…" when a user starts typing.
- Support One-to-One and Group Chats o For one-to-one chats, create separate rooms to facilitate private conversations. o Additionally, for group chats, establish distinct group rooms to accommodate multiple users in group discussions.
- Implement Online Status
o Allow users to display their online or away status.
o You can monitor a user's WebSocket connection to determine if they are currently active or have left the connection.
Conclusion
In today's fast-paced digital world, real-time communication is fundamental to modern web applications. Building a real-time chat system using Django, a versatile Python web framework, offers a range of advantages. Real-time chats enhance user engagement, foster instantaneous information exchange, promote collaboration in team environments, and improve customer support, ultimately enhancing the overall user experience.
In this article, we've seen the process of creating a real-time chat system with Django. From setting up the environment and configuring Django Channels to implementing chat functionality, testing, and deployment, you've gained valuable insights into creating an efficient and interactive chat system.
Resources
● Django Channels Documentation,Django Channels
● Django docs, Django Docs
● Validating websockets, Check WebSocket request in browser.

