Building a real-time notification system is challenging, but event-driven programming simplifies it and makes it scalable. By enabling asynchronous event handling, this approach ensures the timely delivery of notifications like chat messages, order updates, or system alerts, which is essential for any modern software application. Event-driven programming eliminates the need for complex polling mechanisms and allows systems to scale as needed. This article will explore how event-driven programming works and how to implement a real-time notification system.
What is event-driven programming?
At its core, event-driven programming is all about responding to events. These events can be user actions (e.g., button clicks), other system messages, or real-time data changes. In an event-driven programming model:
- Producers generate events.
- Consumers listen to and act on those events.
- Middleware (like message brokers) often coordinates the flow of events.
This is in stark contrast to traditional, linear programming paradigms. Where traditional programs follow a predefined sequence of steps, event-driven programming allows the program to “wait” for events and respond dynamically without blocking other operations.
How event-driven programming enables real-time notifications
The asynchronous and decoupled nature of event-driven programming is what makes it perfect for real-time notifications:
-Asynchronous processing: Notifications are triggered without waiting for other tasks to finish, ensuring system performance under load.
-Scalable distribution: With tools like Kafka, events can be consumed by multiple subscribers simultaneously.
-Reliability: Message queues ensure that events are processed even if the consumer system is temporarily unavailable.
Building a real-time notification system
Let’s build a simple notification system using Kafka and a rest API.
For this demo project, Kafka was selected as the core technology due to its robust capabilities for handling real-time data processing, stream management, and its ease of use.
We will design our notification system that uses Kafka to handle different notification types in a scalable and decoupled manner. A REST API receives requests and routes the messages to the appropriate Kafka topic based on the notification type (email, SMS, push, etc.).
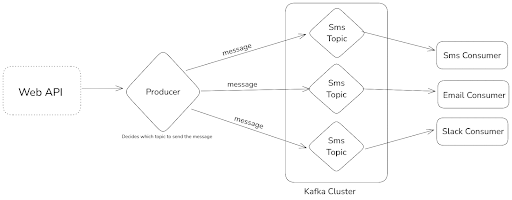
This notification system uses Kafka to manage different notification types (like email, SMS, and push notifications) in a scalable and decoupled way. Here's how it works:
1.The REST API receives requests and identifies the type of notification (email, SMS, push, etc.).
2.The API then sends the message to the appropriate Kafka topic based on the notification type.
3.Each Kafka topic has its dedicated consumer (e.g., Email Consumer, SMS Consumer).
4.Kafka ensures real-time message processing, scalability, and fault tolerance by storing messages, so consumers can process them even if there are failures.
This system is highly scalable since we are using event-driven programming. For example, if in the future you need to support a new notification type, like WhatsApp, you can simply add a new Kafka topic and consumer for WhatsApp. This way, the system scales without needing to modify the existing logic, ensuring flexibility and easy maintenance.
It also provides fault tolerance, ensuring notifications are not lost during failures. By decoupling the API from the notification logic, the system is more maintainable and flexible for future enhancements.
In this tutorial, we will focus on understanding event-driven architecture. Instead of sending the notification, we’ll keep it simple by logging a message to the console. This message will represent the notification being sent.
Let's get started!
Step 1: Setting up Kafka
Let's create a local Kafka setup. First, we need to install Kafka locally. Feel free to use any other Kafka server that is available to you. You can skip this part if you already have a local setup or another Kafka server. The fastest way to install Kafka is by using a Docker setup.
If you don’t have a local docker setup then download and install it from the official site.
Create a docker-compose.yml file to define a Kafka setup. The following configuration uses Apache Kafka with Zookeeper:
version: '3.8'
services:
  zookeeper:
    image: confluentinc/cp-zookeeper:latest
    container_name: zookeeper
    environment:
      ZOOKEEPER_CLIENT_PORT: 2181
      ZOOKEEPER_TICK_TIME: 2000
    ports:
      - "2181:2181"

  kafka:
    image: confluentinc/cp-kafka:latest
    container_name: kafka
    ports:
      - "9092:9092"
    environment:
      KAFKA_BROKER_ID: 1
      KAFKA_ZOOKEEPER_CONNECT: zookeeper:2181
      KAFKA_ADVERTISED_LISTENERS: PLAINTEXT://localhost:9092
      KAFKA_OFFSETS_TOPIC_REPLICATION_FACTOR: 1
    depends_on:
      - zookeeper
Now let's run the docker to set the Kafka locally.
docker-compose up -dThis command will set up the docker for us. For managing Kafka clusters and viewing events in Kafka topics, user-friendly tools like Offset Explorer are highly recommended. Offset Explorer is a popular choice that allows you to monitor and interact with Kafka topics and easily track event offsets. In this tutorial, we'll be using Offset Explorer, but feel free to use any tool of your choice, as the process will be similar across different Kafka management tools.
Download & install offset explore from the official site. Once installed, let's create a new Kafka cluster. A cluster in Kafka is a group of Kafka brokers working together to manage message streams. You can give your cluster any name you like. In the "Bootstrap Servers" field, enter "localhost:9092" since our Kafka server is running there.
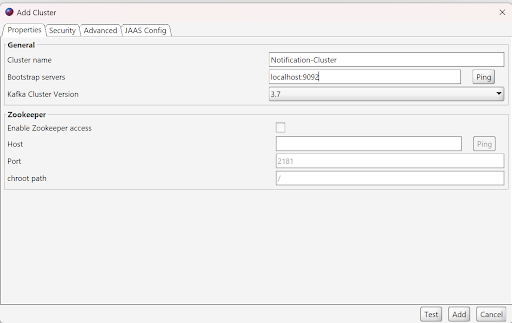
Click on test & then add it. After adding this connection, right-click on it and connect it.
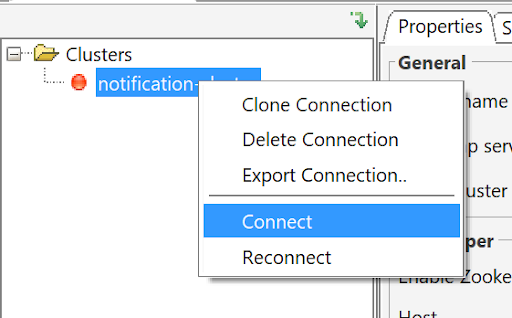
Navigate to the Topics section and create the following topics:
-emailTopic
-smsTopic
In the future, if we support additional mediums, we can simply add new topics here. Each topic will have its corresponding consumers. This is one of the main benefits of using event-driven programming.
Step 2. Initialize node.js project
Let’s start by setting up our project. First, create a new folder named notification-system for our project.
Then, navigate inside the folder and initialize a new node js project by running the following command:
npm init -yNext, we need to install the necessary packages for our project. Run the command below to install kafkajs, express, and body-parser:
npm install kafkajs express body-parserAdditionally, we’ll need some development dependencies. Install nodemon, typescript, ts-node, and the necessary type definitions for node and express by running:
npm install nodemon typescript ts-node @types/node @types/express --save-devOnce the packages are installed, initialize TypeScript in the project by running:
npx tsc --initWith the project setup complete, it’s time to start adding the necessary code files and folders. By the end, our folder structure would look like this:
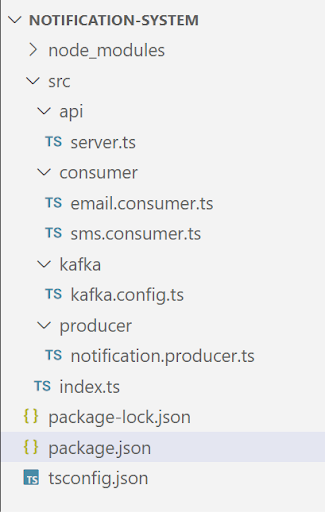
Step 3: Kafka configuration
Let’s begin by configuring Kafka in our project using kafkajs. This will allow us to integrate Kafka messaging into our system.
Create a new folder named src, and inside it, create another folder called kafka. Inside the kafka folder, create a file named kafka.config.ts and add the following code to it.
src/kafka/kafka.config.ts
import { Kafka } from "kafkajs";

export const kafka = new Kafka({
  clientId: "notification-system",
  brokers: ["localhost:9092"],
});

export const producer = kafka.producer();
export const smsConsumer = kafka.consumer({ groupId: "sms-group" });
export const emailConsumer = kafka.consumer({ groupId: "email-group" });
Here, we have set up Kafka in the project using kafkajs. We configured a Kafka client to connect to a broker at localhost:9092 and created a producer to send messages. Here replace the address with your kafka broker address.
Also, we have set up two consumers: one for handling SMS notifications and another for email notifications, each assigned to their respective consumer groups ("SMS-group" and "email-group"). This allows us to send and receive messages through Kafka for different types of notifications.
Step 4: Producer
Now that Kafka is configured in our project, let's create a producer responsible for sending messages to a Kafka topic.
Inside the src folder, create a new folder named producer. Within this folder, create a file called notification.producer.ts.
src/producer/notification.producer.ts
import { producer } from "../kafka/kafka.config";

interface NotificationPayload {
  recipient: string;
  message: string;
  type: string;
}

export const sendNotification = async (payload: NotificationPayload) => {
  const topic = payload.type === "email" ? "emailTopic" : "smsTopic";

  await producer.connect();
  await producer.send({
    topic,
    messages: [{ key: payload.recipient, value: JSON.stringify(payload) }],
  });
  console.log(`Message sent to ${topic}:`, payload);
  await producer.disconnect();
};
Here, we have created a function sendNotification that sends a message to a Kafka topic based on the notification type. The function takes a NotificationPayload (which includes recipient, message, and type) and determines whether to send the message to the "emailTopic" or "smsTopic" based on the type.
The producer is connected, the message is sent to the determined topic, and then the producer is disconnected. Finally, a log is printed showing the message sent and the topic it was sent to.
Step 5: Consumers
After setting up the producer, we need to create consumers who will listen for messages pushed to the Kafka topics. This follows the principles of event-driven architecture, where events trigger actions across the system. Since we have two topics, emailTopic and smsTopic, we will create two separate consumers for them.
Let’s start by creating the email consumer.
Inside the src folder, create a new folder called consumer, and within this folder, create a file named email.consumer.ts and add the below code to it.
src/consumer/email.consumer.ts
import { emailConsumer } from "../kafka/kafka.config";

export const startEmailConsumer = async () => {
  await emailConsumer.connect();
  await emailConsumer.subscribe({ topic: "emailTopic", fromBeginning: true });

  try {
    console.log("Email Consumer is running...");
    await emailConsumer.run({
      eachMessage: async ({ message }) => {
        const payload = JSON.parse(message.value!.toString());
        //here write your code to send email using the email provider
        console.log(`Processing email notification:`, payload);

      },
    });
  } catch (error) {
    console.error("Error in email consumer:", error);
    // Properly disconnect the consumer on error
    await emailConsumer.disconnect();
  }
};
Here, we have created the startEmailConsumer function that connects to the Kafka consumer for the emailTopic. The consumer subscribes to the topic, starting from the beginning to process all available messages. The function then enters a loop, where it listens for new messages and processes them by parsing the message payload and logging the email notification details. If an error occurs, it logs the error and properly disconnects the consumer to ensure clean handling.
Create another file named sms.consumer.ts inside the consumer folder. This file will handle the consumption of messages for the SMS notifications.
src/consumer/sms.consumer.ts
import { smsConsumer } from "../kafka/kafka.config";

export const startSmsConsumer = async () => {
  await smsConsumer.connect();

  await smsConsumer.subscribe({ topic: "smsTopic", fromBeginning: true });

  try {
    console.log("SMS Consumer is running...");
    await smsConsumer.run({
      eachMessage: async ({ message }) => {
        const payload = JSON.parse(message.value!.toString());
        //here write your code to send sms using the sms provider
        console.log(`Processing SMS notification:`, payload);
      },
    });
  } catch (error) {
    console.error("Error in SMS consumer:", error);
    await smsConsumer.disconnect();
  }
};
Here, we have created the startSmsConsumer function, which is similar to the email consumer. It connects to the sms consumer, subscribes to the smsTopic, and processes incoming messages by logging the SMS notification details. If an error occurs, it disconnects the consumer.
Step 6: Web API
Now that our Kafka setup, producers, and consumers are in place, it’s time to create a web API that will allow the end user to send a message, which will then be pushed to the Kafka topic via the producer.
Inside the src folder, create a new folder called api. Then, within this folder, create a file named server.ts.
src/api/server.ts
import express from "express";
import bodyParser from "body-parser";
import { sendNotification } from "../producer/notification.producer";

const app = express();
const PORT = process.env.PORT || 3000;

app.use(bodyParser.json());

app.post("/sendNotification", async (req, res) => {
  const { type, recipient, message } = req.body;

  if (!type || !recipient || !message) {
    res
      .status(400)
      .json({ error: "Missing required fields: type, recipient, message" });
    return;
  }

  try {
    await sendNotification({ recipient, message, type });
    res.status(200).json({ status: "Notification sent successfully" });
  } catch (error) {
    console.error("Error sending notification:", error);
    res.status(500).json({ error: "Failed to send notification" });
  }
});

app.listen(PORT, () => console.log(`API running on http://localhost:${PORT}`));
Here, we have created a simple Express web API that listens for POST requests. When a request is made, it expects a body containing the type, recipient, and message fields. If any of these are missing, it returns a 400 error.
If the required fields are present, the API calls the sendNotification function to push the message to the appropriate Kafka topic. If the message is successfully sent, it responds with a success message. If there’s an error, it logs the error and responds with a failure message. The API runs on a specified port, defaulting to 3000.
Step 7: Entry point
Now, let’s bring everything together by creating a single entry point for our application. This will allow us to run just one file, and it will take care of initializing everything.
To do this, we’ll add a new file called index.ts inside the src folder and add the below code to it.
src/index.ts
import { startEmailConsumer } from "./consumer/email.consumer";
import { startSmsConsumer } from "./consumer/sms.consumer";
import "./api/server"; // Start the Express server

const main = async () => {
  await startEmailConsumer();
  await startSmsConsumer();
  console.log("Notification system is ready!");
};

main().catch(console.error);
Here, we have created the main entry point of the application. It starts both the email and SMS consumers and then starts the Express server by importing the server.ts file. Once the consumers are running, it logs that the notification system is ready. Finally, in the package.json file, we need to add a start script that uses nodemon to run our application. This script will automatically restart the application when changes are made. The script should look like this:
package.json
"scripts": {
    "start": "nodemon --exec ts-node src/index.ts"
  },
Step 8: Running the application
Let's run the application using the below command:
npm run startBefore running this command, ensure your Kafka server is up and running.
Once you run this command you can see the output in the console, make sure there is no error. If you have followed this tutorial then you will receive a message “Notification system is ready!”. This indicates that your system is up and running.
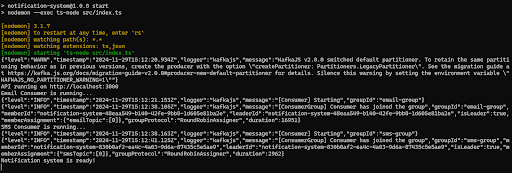
Let's test our application and see the real-time notification in action.
Step 9: Testing the application
We'll call the web API to test our application and pass the required parameters. After triggering the API, we can check the application’s output logs to verify if the notification was successfully sent to the end user.
Additionally, we'll use Offset Explorer to ensure the messages were properly published to the Kafka topic and consumed by the relevant consumers. This validates that the event-driven programming flow is working as intended, ensuring messages are processed asynchronously and in real-time across the system.
I’ll be using Postman to send API requests but feel free to use any API client you prefer. In Postman, enter the URL that sends the notification. For this example, it’s: http://localhost:3000/sendNotification
Next, in the request body, add the following JSON:
{
    "type":"sms",
    "recipient":"0123456789",
    "message":"Your order has been delivered!"
}
This would typically send an SMS to the recipient with the message. However, in our case, we’re logging the message to the console instead.
We’re doing this to focus on demonstrating the event-driven architecture without actually sending actual notifications, which helps us test the flow and processing logic without needing to interact with an external service.
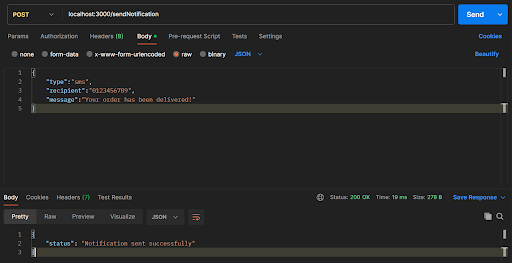
Let's verify if your message is present in the Kafka topic, follow these detailed steps:
1.Open the Offset Explorer Tool:
-Launch the Offset Explorer tool to access your Kafka environment.
2.Navigate to the topics section:
-In the main menu or interface, locate the section labeled Topics.
-Click on it to view a list of all available Kafka topics.
3.Find the topic smsTopic:
-Browse through the list of topics and search for the topic named smsTopic.
-Once found, click on it to open the details for this specific topic.
4.Go to the data tab:
-Within the smsTopic view, look for a tab or section labeled Data.
-Click on this tab to access the data/messages associated with the topic.
5.Replay the messages:
-In the Data section, you should see a Replay button or similar functionality.
-Click the Replay button to load and display all the messages that have been published to the smsTopic.
6.Review the messages: -The tool will show you the list of messages, along with details like offsets, timestamps, and payloads. -Look through the displayed messages to confirm if your expected message is present.

With this, you’ve successfully built a real-time notification system using event-driven programming, achieving an efficient and scalable solution for handling events.
Conclusion
Event-driven programming streamlines the creation of real-time notifications by providing an efficient, scalable, and reliable approach to managing asynchronous operations. This paradigm enables systems to respond instantly to events as they occur, ensuring seamless delivery of updates. Decoupling the components of a system enhances flexibility, improves maintainability, and supports scalability. Whether handling high volumes of data or ensuring low-latency responses, event-driven systems offer a robust foundation for building responsive and dynamic notification services.
The next time you implement real-time features in your app, consider the magic of event-driven programming—it’s a game-changer for modern software development.

